
Redux を使って見通しのよいプログラムを書きます。
Reduxの概要
Redux は状態管理アーキテクチャとしてウェブアプリケーション開発者に広く使用されていて、Flutter でも利用できます。
Redux には以下の 3 原則があります。
- Single source of truth
アプリの状態 State は全て一つの Store で一元的に管理される。
- State is read-only
Action を呼び出す以外に State を変更する方法はなし。
- Changes are made with pure functions
Reducer という純粋な関数を作成して、State の変更ルールを決める。
以上の 3 原則の下で、Redux による状態管理の挙動を簡単に制御および予測できるようになります。
Redux のルールが厳密に定義されているため、コードがやや複雑になるデメリットがあります。
その一方で、問題が起こりにくくなるため、デバッグやメンテナンスなどの作業を考慮すると、とても便利なツールです。
Redux を採用するメリット
-
Redux は将来的に無くなる確率が低い。なぜならば、これまでの歴史が長いため、破壊的な変化が起きる可能性は恐らくなく、安定している。また、Redux に精通したエンジニアは多いので、開発プロジェクトに採用される割合が高い。
-
Redux は Flutter に限ったものではなく。 React などを使った他のプロジェクトでも応用が効く。
-
Redux はグローバル領域に大きなオブジェクトを状態として保持する。それにより、 Reducer が純粋な関数であることが保証されるので状態の不整合は起きない。他の状態管理で生じがちなタイミングによる不整合は Redux では起きません。
-
グローバルに状態を持つ Redux は依存関係の問題が起きにくい。
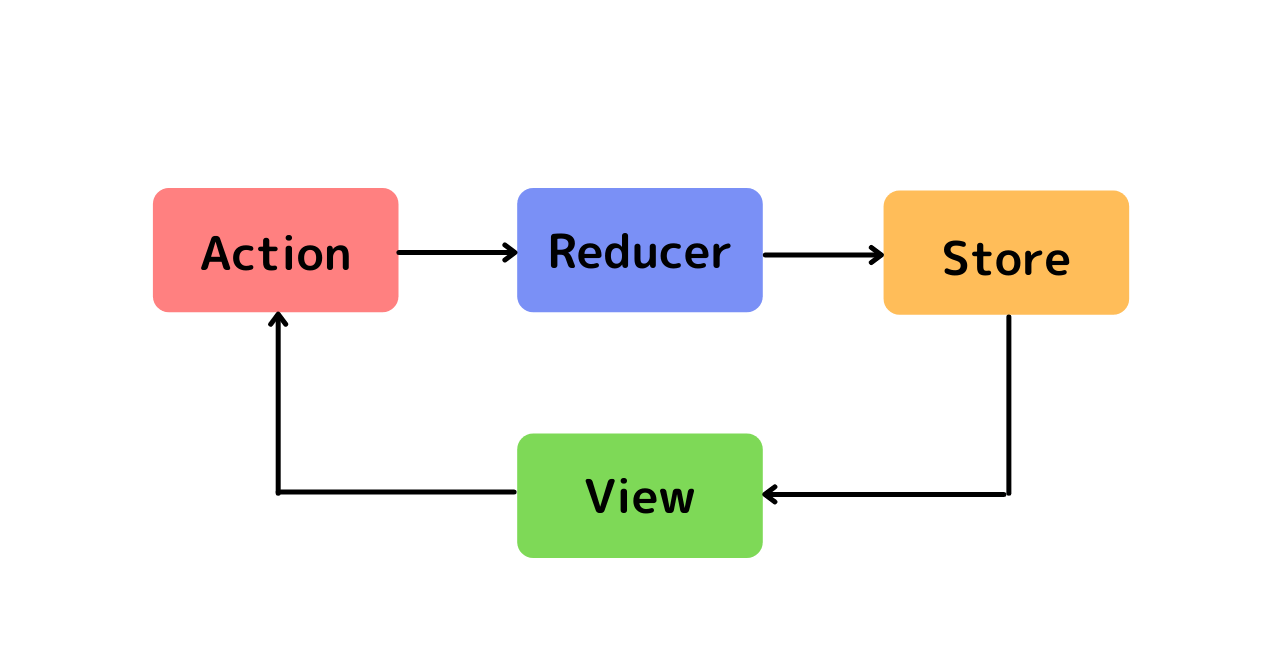
動作フロー
Redux の動作フローを以下の図に示します。
Viewでボタンのような Widget があるActionを呼び出します。- その
Actionが、自分に対応するReducerを呼び出します。 - 呼び出された
Reducerが、新しいStateを作ってStoreに格納します。 ViewがStoreにある新しいStateに基づいてリレンダリングします。
この内容は、中上級者向けに書かれています。 Redux の哲学を十分に理解した上でご覧ください。
プラグインのインストール
それでは、Redux をプロジェクトに導入してみましょう。
pubspec.yaml の dependencies ブロックの中に、 flutter_redux: ^0.7.0を記述します。
例えば、
dependencies:
  flutter:
    sdk: flutter

  # The following adds the Cupertino Icons font to your application.
  # Use with the CupertinoIcons class for iOS style icons.
  cupertino_icons: ^1.0.0
  flutter_redux: ^0.7.0
のようになります。
flutter_redux の 0.7.0 はプラグインのバージョンです。
こちら に最新のバージョンが載っていますので確認してください。
そして、ターミナルを開き、
$ flutter packages getと入力します。これでインストールは完了です。
ライブラリをインポート
まず、ライブラリを使用したい .dart ファイルの一番上の方に、
import 'package:redux/redux.dart';
import 'package:flutter_redux/flutter_redux.dart';
と書き、 Redux をプロジェクトで使えるようにします。
State の定義
まずは、 State の定義を行っていきます。
今回は、 count という数値を Redux で管理してみます。初期値は 0 と代入します。
// 全て状態を AppState というクラスで一元的に管理します
class AppState {
  final int count;

  AppState({
    required this.count,
  });

  // 状態の初期値を与えます
  AppState.initialState()
      : count = 0;
}
Action の定義
Action をクラスとして定義します。 プロパティを定義しても良いでしょう。
今回は、 +1 、 -1 するような Action を定義してみます。
class HomeMinusOneAction {}

class HomePlusOneAction {}
Reducer の定義
次に、 Reducer の定義です。 +1 、 -1 して次の State を返します。
// Reducer は新しい State を返すので、返り値の形は AppState です
AppState appReducer(AppState prevState, action) {

  // 呼び出された Action を判断して、返す状態を分岐させます
  if (action is HomeMinusOneAction) {
    return AppState(count: prevState.count - 1);
  }
  if (action is HomePlusOneAction) {
    return AppState(count: prevState.count + 1);
  }

  // 定義されていない Action が入ったら、元の状態を返します
  return AppState(count: prevState.count);
}
のようになります。
実際のアプリに埋め込んでみる
StoreProvider
まずは Store を初期化して、 MaterialApp 内部のどこからでも Store に格納されている State にアクセスできるようにします。
ここで、StoreProvider Widget (Store の提供者)が登場します。
StoreProvider はその下にある全ての Widget にある Store にアクセスできるようにします。
したがって、ここでは MaterialApp を StoreProvider でラップします。
class MyApp extends StatelessWidget {
// State を格納する Store を定義
  final Store<AppState> store;

  MyApp()
      : store = Store<AppState> // Store を初期化
    appReducer, // 使用する Reducer を定義
    initialState: AppState.initialState(), // Stateの初期値を生成して代入
  );

  @override
  Widget build(BuildContext context) {

    return StoreProvider<AppState>(
      store: store,
      child: MaterialApp(
        home: MyHomePage(title: 'わかりやすい'),
      ),
    );
  }
}
のようになります。
StoreConnector
Store にアクセスして State を読み取って使用したい時は、StoreConnector(Store の接続者)という Widget を使用します。
StoreConnector の converter プロパティーが膨大な情報を持つ Store から必要な State と Actionだけを抽出してくれます。
今回のカウンターの例において、View を作り上げるのに必要な State と Action を以下の _ViewModelにまとめて使いやすくします。
class _ViewModel {
  final int count;
  final VoidCallback onMinusOne;
  final VoidCallback onPlusOne;

  _ViewModel({
    this.count,
    this.onMinusOne,
    this.onPlusOne,
  });
}
ここで定義した _ViewModel は Redux の一部ではなく、 Store から抽出した必要な State および Action をまとめたクラスに過ぎません。
以下のコードのように、converter が state.count、HomeMinusOneAction および HomePlusOneAction を抽出して _ViewModel に格納した後、 builder が converter の返り値の viewModel を利用して View を作ることができます。
class _MyHomePageState extends State<MyHomePage> {

  @override
  Widget build(BuildContext context) {
    return StoreConnector<AppState, _ViewModel>(
      converter: (store) {  // Store から State と Action を抽出
        return _ViewModel(  // _ViewModel に格納
          count: store.state.count,
          onMinusOne: () => store.dispatch(HomeMinusOneAction()),
          onPlusOne: () => store.dispatch(HomePlusOneAction()),
        );
      },
      // viewModel は上の converter の返り値です
      // builder は viewModel 情報を使って View を作成
      builder: (BuildContext context, _ViewModel viewModel) =>
          Scaffold(...
これで、 viewModel に対して、 Action を dispatch する関数を含めて Widget に渡すことができます。
そして、ボタンを押下したときに、 viewModel に対して定義した関数を叩いてあげれば OK です。
onPressed: () => viewModel.onPlusOne()store.dispatch(HomeMinusOneAction()) のように定義した Action を呼び出すことができます。
コードの例
State、Action、Reducer および実装コードをまとめると以下のようになります。
import 'package:flutter/material.dart';
import 'package:redux/redux.dart';
import 'package:flutter_redux/flutter_redux.dart';
// State の定義
class AppState {
final int count;
AppState({
required this.count,
});
AppState.initialState()
: count = 0;
}
// Action の定義
class HomeMinusOneAction {}
class HomePlusOneAction {}
// Reducer の定義
AppState appReducer(AppState state, action) {
if (action is HomeMinusOneAction) {
return AppState(count: state.count - 1);
}
if (action is HomePlusOneAction) {
return AppState(count: state.count + 1);
}
return AppState(count: state.count);
}
// アプリの実行
void main() => runApp(MyApp());
class MyApp extends StatelessWidget {
final Store<AppState> store;
// MyApp を生成する際に Store をも生成させます
MyApp()
: store = Store<AppState>(
appReducer, initialState: AppState.initialState());
@override
Widget build(BuildContext context) {
// MaterialApp のどこからも Store にある AppState にアクセスできるようにします
return StoreProvider<AppState>(
store: store,
child: MaterialApp(
home: MyHomePage(title: 'わかりやすい'),
),
);
}
}
// View を作るのに必要な State と Action を集結してクラスを作成します
class _ViewModel {
final int count;
final VoidCallback onMinusOne;
final VoidCallback onPlusOne;
_ViewModel({
this.count,
this.onMinusOne,
this.onPlusOne,
});
}
class MyHomePage extends StatefulWidget {
MyHomePage({Key key, this.title}) : super(key: key);
final String title;
@override
_MyHomePageState createState() => _MyHomePageState();
}
class _MyHomePageState extends State<MyHomePage> {
@override
Widget build(BuildContext context) {
// Store にアクセスして State や Action を使って View を作ります
return StoreConnector<AppState, _ViewModel>(
// Store から必要な要素を _ViewModel に集約します
converter: (store) {
return _ViewModel(
count: store.state.count,
onMinusOne: () => store.dispatch(HomeMinusOneAction()),
onPlusOne: () => store.dispatch(HomePlusOneAction()),
);
},
// converter が作ってくれた viewModel で View を作成していきます
builder: (BuildContext context, _ViewModel viewModel) => Scaffold(
appBar: AppBar(
title: Text(widget.title),
),
body: Center(
child: Column(
mainAxisAlignment: MainAxisAlignment.center,
children: <Widget>[
Text("${viewModel.count}"),
Padding(
padding: EdgeInsets.only(top: 20.0),
child: ElevatedButton(
style: ElevatedButton.styleFrom(
backgroundColor: Colors.lightBlue,
padding: EdgeInsets.all(20.0),
),
onPressed: () => viewModel.onPlusOne(),
child: Text('Plus One'),
),
),
Padding(
padding: EdgeInsets.only(top: 20.0),
child: ElevatedButton(
style: ElevatedButton.styleFrom(
backgroundColor: Colors.lightBlue,
padding: EdgeInsets.all(20.0),
),
onPressed: () => viewModel.onMinusOne(),
child: Text('Minus One'),
),
),
],
),
),
),
);
}
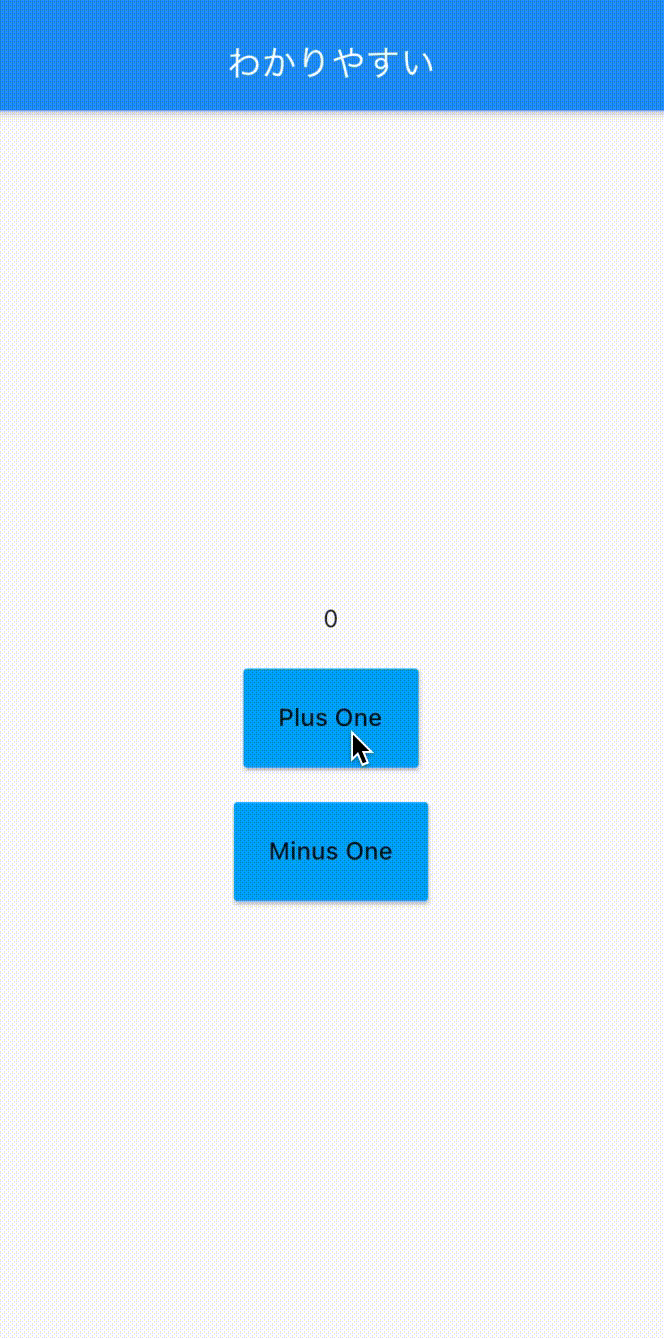
}スクリーンショット
上のボタン「Plus One」を押すと、 +1 され、 下のボタン「Minus One」を押すと、 -1 されます。